

Can you refire Silver Clay?
I was teaching a workshop the other day and I was talking about refiring a piece made from Silver Clay and someone asked me “Wait, what…you can refire Silver Clay?” and it occurred to me that some people may not know that.
I am here writing a little blog on the subject to help those folks out. Because the answer is yes – you can refire silver clay. As many times as you want or is necessary for your project.
And I suppose if you didn’t know that you can refire Silver Clay, you might want to know why would you? Here are some of the reasons you would…
Top Reasons to refire Silver Clay
Repairing your piece.
If something has cracked or broken – then make sure your piece is white (as in freshly fired) and add to or repair your piece as necessary. Then you can refire your Silver Clay piece altogether to make it one entire piece. If you need more information on how to repair a fired piece of Silver Clay – then please check out my YouTube video showing you how.
You may want to remove something from the surface of your piece.
This could be just oxidization – I refire my example class pieces once a year to clean them up and remove any oxidization from the surface of the silver. It is way easier than sitting cleaning each individual piece and repolishing. You also may want to refire your Silver Clay to remove a patina or colour such as resin. Although in the case of resin, I would remove with some acetone first then refire because resin can have some toxic burnoff.
You may want to make your piece in several stages.
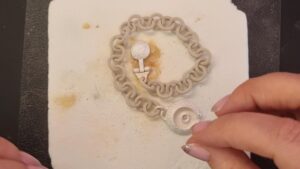 For my recent SINTER class, I wanted to make the catch with the hinge first – to minimise any distortion of the hinge. I then wanted to attach the unfired silver clay chain to the clasp and refire. It worked beautifully. This could also be the case for attaching silver clay pieces together where you want a different firing temperature – so for example – a glass cabochon setting onto a ring. You’ll fire the ring at the highest temperature for the strongest result and then attach the glass setting to the ring and refire at a lower temperature, which is suitable for glass.
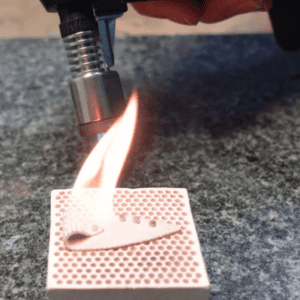
You may have hand fired something and then want to kiln fire for extra strength.
Let me explain…most of my students start off with firing with a hand torch which is a good way for beginners to fire. But as they grow in the School, they may take advantage of my Kiln Vouchers or they may acquire a kiln of their own. These pieces which have been handfired, can now be refired in a kiln with no issues at all.
I hope that’s given you some insight into why you would refire your Silver Clay pieces. Are there any I’ve missed? Please let me know in the comments section of this blog. I’d love to hear your opinions.
Love, Emma x


I appreciate the information on re-firing. My piece cracked and I want to add an embellishment to cover the problem.
Oh good, I am glad you found it useful!
Hello, there’s something I I don’t quite understand: “… make sure your piece is white (as in freshly fired)…” Finished pieces are polished and clean. Do you refer to the state before polishing? Can pieces only be refined when still white after firing? Or can they also be altered when already polished and finished? Because then they can’t get white again, can they? Hopefully you can answer my question. Thank, Andy.
Hello Andrea
Yes, I do mean the stage before polishing, when it’s freshly fired.
If you want to add something after the piece has been polished, you can, just refire your piece. What that does is change the silver particles within your piece to start standing up again. (When you polish, you’re flattening all the silver pieces down which makes them reflective)
Even if you polish, if you refire, you are disturbing the silver particles so they don’t lie entirely flat and therefore, it gives your piece a ‘tooth’, something for the new clay to grip onto. It won’t ever have the new white when you’ve polished, but it will change the surface enough for a ‘tooth’
Hope that helps.
Emma x
I attended a silver clay workshop and I am hooked. I am now trying to work at home (alone) and after an unsuccessful first try I used the silver clay to model a simple pebble to wear on a leather cord. I sanded smooth all sides and fired with a hand torch. Waited for the cherry pink glow and 3 mins. I was a bit surprised I didn’t get tge white residue we got at the workshop but carried on nonetheless with the polishing but my piece is dull and doesn’t have the clear silver shine – could it be that I should have fired it l9nger since it thicker than the leaves we made at the class? The pebbles is about 4mm thick. Thank you
Hi Angie
Thank you for your comment. Without seeing it for myself, it sounds very much like you have fired it at too high a temperature. It should not be glowing cherry pink – that’s generally for soldering (Sterling silver), it should be a peachy orange glow. Check out my other blog on firing, there’s a lot of information there that can hopefully help you.
Emma x